Articles
- Page Path
- HOME > Restor Dent Endod > Volume 36(6); 2011 > Article
- Case Report Diastema closure with direct composite: architectural gingival contouring
- Yeon-Hwa Kim, DDS, Yong-Bum Cho, DDS, PhD
-
2011;36(6):-520.
DOI: https://doi.org/10.5395/JKACD.2011.36.6.515
Published online: November 30, 2011
Department of Conservative Dentistry, Dankook University College of Dentistry, Cheonan, Korea.
- Correspondence to Yong-Bum Cho, DDS, PhD. Professor, Department of Conservative Dentistry, Dankook University College of Dentistry, 201 Manghyang-ro, Dongnam-gu, Cheonan, Korea 330-714. TEL, +82-41-550-1966; FAX, +82-41-550-1963; raindrop@dku.edu
• Received: August 12, 2011 • Revised: October 18, 2011 • Accepted: October 18, 2011
Copyright © 2011 Korean Academy of Conservative Dentistry
- 2,771 Views
- 30 Download
- 7 Crossref
Abstract
-
One of the most challenging task in closing anterior diastema is avoiding "black triangle" between the teeth.This paper reports a case that the closure of diastema in anterior teeth could be successfully accomplished using direct adhesive restorations and gingival recontouring. The traditional technique using Mylar strip was modified to increase the emergence profile with natural contours at the gingival-tooth interface. Mylar strip was extended out of the sulcus by approximately 1 mm high from the gingival margin, and a small cotton pellet was used to provide the emergence contour. This modified approach is acceptable for the clinical situation.
INTRODUCTION
Anterior diastema may compromise the harmony of a patient's smile. Among the suggested options for diastema closure such as orthodontics, restorative dentistry, and prosthodontics, it is appreciable that restorative approach is the simplest, fastest, most predictable, and lowest solution.1 But, handling composite freehand requires skillful practice and it may be considered as a disadvantage to some operators. Also, one of the difficulties encountered is closing diastema without creating "black triangles".2 It is especially difficult with wide gingival embrasure and thick gingival biotype. To prevent the formation of a black triangle between the teeth when closing diastema, it requires careful considerations in the gingival architecture based on the concepts of cervical contouring and location of the contact point.
A number of studies were conducted to investigate the factors that influence the presence of the interdental papilla.3-8 It has long been known that the distance from the contact point (CP) to the alveolar bone crest (BC) is a significant determinant in whether a papilla will fill the interdental space. Tarnow et al. reported that interdental papilla were often present when the CP-BC distance was 5 mm.3-5
In order to determine the appropriate location of the contact point, a non-invasive method to measure the distance between the bone crest and the gingival crest was accomplished. Also, the traditional technique using Mylar strip was modified to increase the emergence profile with natural contours at the gingival-tooth interface. This paper is to describe a case report in which the diastema closure was accomplished using direct adhesive restorations and gingival tissue recontouring technique.
CASE REPORT
A 30-year-old male came to the department of conservative dentistry, Dankook university dental hospital, complaining about the space in the middle of front teeth. A clinical examination revealed 2 mm space between maxillary central incisors, with favorable gingival hygiene (Figure 1). The patient didn't want orthodontic or prosthodontic considerations. The treatment plan to attain an esthetically favorable relation between the maxillary anterior teeth involved closing the diastema, nonsurgical gingival contouring of the interdental papilla using composite resin restorations.
A small piece of a temporary radiopaque material (Caviton, GC, Tokyo, Japan) was located between the teeth for the landmark of determining the proper position of the contact point. Periapical radiographs were taken by using a paralleling technique with a film holder (XCP,Dentsply-Rinn, Elgin, IL, USA). Files were transferred to a personal computer and examined with a resolution of 1,024 × 768 pixels (Figure 2a). The length from the most coronal portion of the crestal bone to the radiopaque material was measured with the Photoshop CS2. Also, the length from the bottom of the radiopaque material to incisal edge of the central incisors was measured.
A study model was fabricated to measure the actual length between the top of the papilla and incisal edge of the central incisors. The actual length between the crestal bone and the top of papilla was calculated using a proportional expression. The actual papilla length was 3.97 mm (Figure 2b). Based on the distance, the contact point was defined approximately 5.0 mm from the bone crest. The study model was mocked up so that a plan of proposed esthetic treatment could be presented to the patient. The analysis of the length and the width of the upper central incisors demonstrated an unfavorable proportion after the closure with composite resin (Figure 3). But, the patient was satisfied with the result of the study model. Therefore, the closure using direct composite resin was decided.
In this case, because of the large space and thick gingival biotype, the increase of emergence profile was difficult. Willhite suggested the diastema closure using a narrowed Mylar strip and cotton pellet to increase the emergence profile and gingival tissue recontouring.9 Accordingly, this procedure was applied in this case. The patient was anesthetized, and teeth were isolated with insertion of a gingival retraction cord (Figure 4a). A Mylar strip was cut lengthwise to extend out of the sulcus by approximately 1 mm and then was placed in a particular fashion. The narrowed strip was fully seated into the sulcus and a small cotton pellet was placed between the tooth and the Mylar strip, and gently packed into the sulcus (Figure 4b). After 5 minutes, cotton pellet was removed to gain the empty space through the gingival contouring (Figure 4c).
The narrowed Mylar strip was then set aside. The tooth surface was etched with 37% phosphoric acid for 15 seconds. After water rinsing followed by the application of an adhesive, the narrow Mylar strip was replaced, and the tooth was built up with composite resin, shade A2 (Filtek Z-250 Universal Restorative, 3M ESPE, St. Paul, MN, USA). After curing, the Mylar strip was released and the first increment checked. The narrowed Mylar strip was used for gingival contour to the contact point and the remaining contour was sculpted using a full width Mylar strip (Figure 5a). Finishing and polishing were accomplished with Sof-Lex disks and Sof-Lex strips (3M ESPE, Figure 5b). Same procedures were carried out on the opposite tooth (Figure 5c).
Diastema closure in central incisors can be successfully accomplished using direct adhesive restorations and gingival re-contouring (Figures 6a, 6b, 7). After 3 months later, interdental space was filled with interdental papilla (Figure 6c).
DISCUSSION
Diastema closure with direct resin is a recommended procedure, which is frequently accomplished in clinic. However, in cases where there is a wide space between the teeth, the simple closure may not offer a natural and pleasant solution to the patient. The remodeling with composite resin can solve the problem of tooth architecture, but because of an unwanted black triangle between the teeth, such remodeling may not solve the problem of gingival architecture.2
In this case, it is necessary to choose procedures that induce the formation of interdental papilla between the teeth, reestablishing harmony between soft and hard tissues. According to studies, when the distance between the contact point and the bone crest is of 5.0 mm or less, interdental papilla is present.3-8 A soft temporary radiopaque restorative material, periapical radiographs and study model were used to verify the papilla length. Based on such a distance, the contact point was defined as being at approximately 5.0 mm from the bone crest.
De Araujo et al. inserted a needle into the gingival tissue until reaching the bone crest.10 A rubber stop was used to indicate the penetration depth of the needle in the tissue. But, this method is needed to anesthetize, and is painful. The method using a soft temporary radiopaque restorative material and periapical radiographs is non-invasive and more useful. Lee et al. validated a method of measuring the length of the interdental papilla non-invasively, using radiopaque material and a periapical radiograph.11 They used a 5 mm metal ball attached to the teeth for reference material. Martegani et al. used a self-made resin device carrying the 5 mm radiographic metal piece.7 In this case, the actual length of study model was used to verify magnification. Study model was also used for a correct diagnosis and treatment planning.
The narrowed Mylar strip and cotton pellet were useful for controlling emergence and gingival contour. The narrowed Mylar strip was easy to access of resin instrument and improved visibility. A small cotton pellet reduced capacity to relapse into original gingival shape and provided some additional working time for composite placement. Therefore, this modified approach is acceptable for the clinical situation.
- 1. Blatz MB, Hürzeler MB, Strub JR. Reconstruction of the lost interproximal papilla-presentation of surgical and nonsurgical approaches. Int J Periodontics Restorative Dent. 1999;19: 395-406.PubMed
- 2. Helvey GA. Closing diastemas and creating artificial gingiva with polymer ceramics. Compend Contin Educ Dent. 2002;23: 983-998.PubMed
- 3. Tarnow DP, Magner AW, Fletcher P. The effect of the distance from the contact point to the crest of bone on the presence or absence of the interproximal dental papilla. J Periodontol. 1992;63: 995-996.ArticlePubMed
- 4. Kurth JR, Kokich VG. Open gingival embrasure after orthodontic treatment in adults: prevalence and etiology. Am J Orthod Dentofacial Orthop. 2001;120: 116-123.PubMed
- 5. Wu YJ, Tu YK, Huang SM, Chan CP. The influence of the distance from the contact point to the crest of bone on the presence of the interproximal dental papilla. Chang Gung Med J. 2003;26: 822-828.PubMed
- 6. Cho HS, Jang HS, Kim DK, Park JC, Kim HJ, Choi SH, Kim CK, Kim BO. The effects of interproximal distance between roots on the existence of interdental papillae according to the distance from the contact point to the alveolar crest. J Periodontol. 2006;77: 1651-1657.ArticlePubMed
- 7. Martegani P, Silvestri M, Mascarello F, Scipioni T, Ghezzi C, Rota C, Cattaneo V. Morphometric study of the interproximal unit in the esthetic region to correlate anatomic variables affecting the aspect of soft tissue embrasure space. J Periodontol. 2007;78: 2260-2265.ArticlePubMed
- 8. Chang LC. Assessment of parameters affecting the presence of the central papilla using a non-invasive radiographic method. J Periodontol. 2008;79: 603-609.ArticlePubMed
- 9. Willhite C. Diastema closure with freehand composite: controlling emergence contour. Quintessence Int. 2005;36: 138-140.PubMed
- 10. De Araujo EM Jr, Fortkamp S, Baratieri LN. Closure of diastema and gingival recontouring using direct adhesive restorations: a case report. J Esthet Restor Dent. 2009;21: 229-240.ArticlePubMed
- 11. Lee DW, Kim CK, Park KH, Cho KS, Moon IS. Non-invasive method to measure the length of soft tissue from the top of the papilla to the crestal bone. J Periodontol. 2005;76: 1311-1314.ArticlePubMed
REFERENCES
Tables & Figures
REFERENCES
Citations
Citations to this article as recorded by 

- Demystifying the pink enigma: A succinct overview on the interdental papilla
Jaishree Tukaram Kshirsagar, A. Monika, S. Nithiyaraj, S. Sathyasree, K. Shyam Sharma
Journal of Integrative Medicine and Research.2024; 2(2): 60. CrossRef - Gingival Conditioning with Provisional Composite Veneer Prior to Final Dental Restoration: Three-year Follow-up
B Mueller, GB Rauber, LA Linhares, JK Bernardon, E Santini, LF Pottmaier
Operative Dentistry.2023; 48(3): 237. CrossRef - Black Triangle and its Management in Dentistry: A Review Article
Avneet Kaur, Pramod Waghmare, Vidya M Dodwad, Nishita Shivaji Bhosale, Akanksha Mohan Karale, Simran Sunil Singh
Indian Journal of Dental Sciences.2023; 15(2): 99. CrossRef - Maxillary midline diastema closure with sectional feldspathic porcelain veneers: A case series followed 1 to 4 years
Cui‐Ting Chen, Bin Yang, Ya‐Xiong Yin, Xiao‐Dong Wang, Ke Zhao
Journal of Esthetic and Restorative Dentistry.2023; 35(7): 1022. CrossRef - Conservative and esthetic closure of maxillary midline diastema without creating “black triangle” using direct resin composite
Kyoung-Hwa Jung, Eun-Young Kwon, Youn-Kyung Choi, So-Yeun Kim, Hye-Mi Jeon, Jeong-Kil Park
Journal of Dental Rehabilitation and Applied Science.2017; 33(2): 163. CrossRef - DIASTEMA CLOSURE TREATMENT DECISION FOR AN ADOLESCENT PATIENT WITH CEREBRAL PALSY
Koeun Lee, Jae-Ho Lee, Chung-Min Kang
The Journal of Korea Assosiation for Disability and Oral Health.2015; 11(1): 1. CrossRef - Diastema closure using direct bonding restorations combined with orthodontic treatment: a case report
Soon-Kong Hwang, Jung-Hong Ha, Myoung-Uk Jin, Sung-Kyo Kim, Young-Kyung Kim
Restorative Dentistry & Endodontics.2012; 37(3): 165. CrossRef
Diastema closure with direct composite: architectural gingival contouring
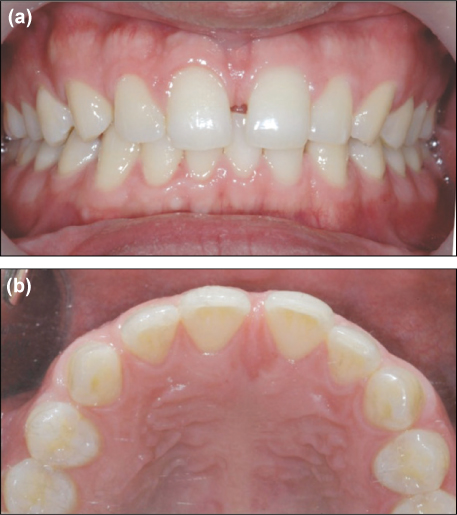
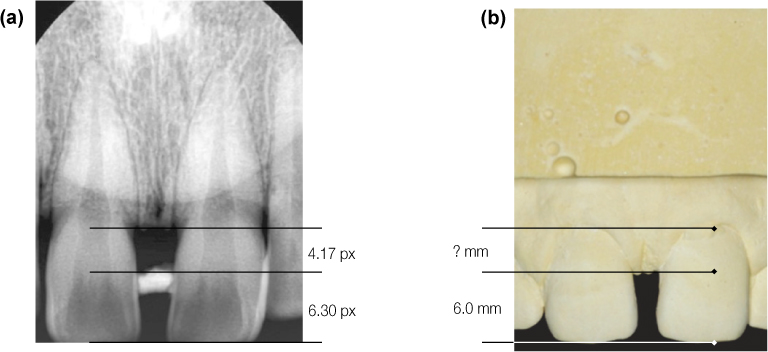
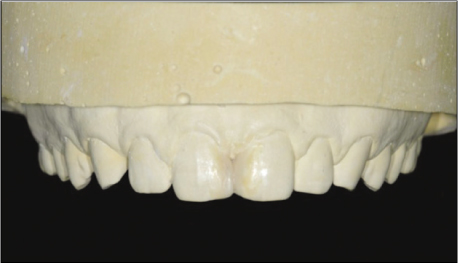
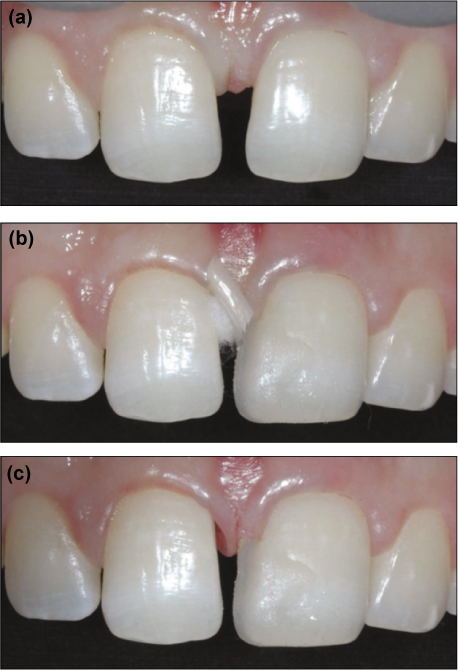
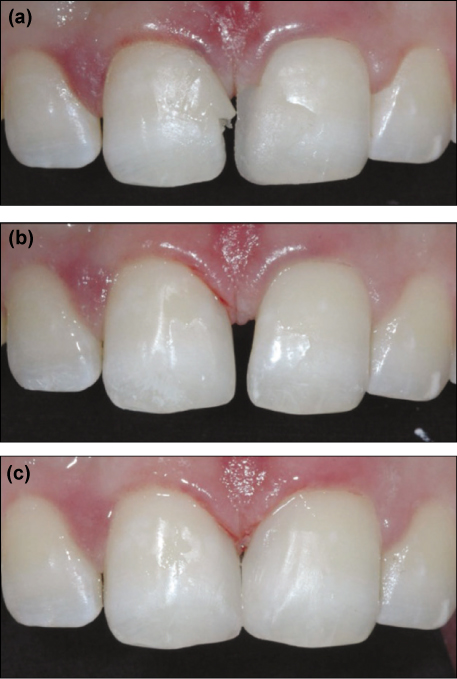
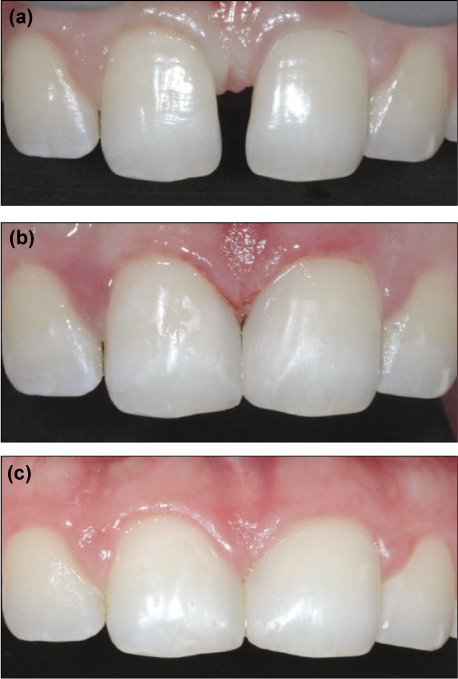
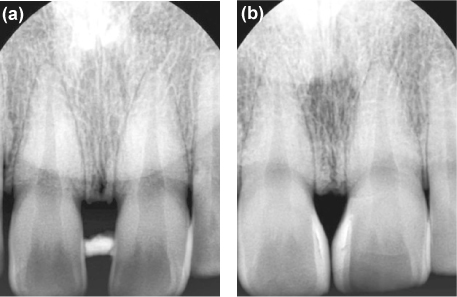
Figure 1
Preoperative intraoral photographs.
(a) Frontal view, (b) Occlusal view.
Figure 2
The length was obtained from the ratio, comparing values of radiograph and the cast.
Figure 3
The dental cast was waxed up to establish the shape of the restoration.
Figure 4
(a) Isolation with a retraction cord, (b) The strip was fully seated and a small cotton pellet was placed, (c) After removal, leaving the space.
Figure 5
(a) After resin build up to the contact point, (b) Completion of resin build-up of #11, (c) Completion of resin build-up of #21.
Figure 6
(a) Preoperative photograph, (b) Postoperative photograph, (c) Follow-up after 3 months.
Figure 7
(a) Preoperative periapical radiograph, (b) Postoperative periapical radiograph.
Figure 1
Figure 2
Figure 3
Figure 4
Figure 5
Figure 6
Figure 7
Diastema closure with direct composite: architectural gingival contouring

 KACD
KACD


 ePub Link
 Cite
Cite

